
IM TILE CONTROLS
GRADANGLE IMAGES
| This tute is meant as an extension on the IM Gradangles. Here I want to show different ways to put the angles together so that we can use them similar to webTV's HTML gradangles. The codes can be a little daunting at first but once you get started it is really not all that hard...and not any harder than the html tables. In fact with IM you have additional options, such as annotating or drawing on the image in addition to manipulations. This tutorial however focuses mostly on getting those angles to form an image. You can use these methods with any type of images. |
|
I already covered how to put all the angles together into a Montage. Briefly, to repeat those codes/method, You input all of your URLs at once. Tell the server how many columns and how many rows (just like a HTML table). You can use many images in a Montage. This is a small example of a 2x2 montage. -tile 2x2 says just that. -geometry +0+0 means there is no cellspacing between the images. | |
<?php $OUT="SRT/montage.gif"; exec ("/usr/bin/montage SRT/WB140.gif SRT/WB_140.gif SRT/BW_140.gif SRT/BW140.gif -tile 2X2 -geometry +0+0 $OUT"); ?> |  |
| Additionally you can put space between images, frames around images and specify a background color. Default is white. | |
|
You can also add a frame and cellspacing (geometry) to a monthage. <?php $OUT="SRT/montageFrame.gif"; exec ("/usr/bin/montage SRT/WB140.gif SRT/WB_140.gif SRT/BW_140.gif SRT/BW140.gif -tile 2x2 -background gray -frame 4 -geometry +5+5 $OUT"); You can also add a shadow to a montage. ?> |  |
<?php $OUT="SRT/montageShadow.gif"; exec ("/usr/bin/montage SRT/WB140.gif SRT/WB_140.gif SRT/BW_140.gif SRT/BW140.gif -tile 2x2 -background '#cc9988' -shadow -geometry +3+3 $OUT"); ?> | 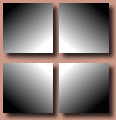 |
You can overlap the images with a neg geometry <?php $OUT="SRT/montageOver.gif"; exec ("/usr/bin/montage SRT/WB140.gif SRT/WB_140.gif SRT/BW_140.gif SRT/BW140.gif -tile 2x2 -geometry -10+0 $OUT"); ?> |  |
You can Composite images onto a background. Just declare the location with -geometry +pixels from left+pixels from top <?php $OUT="SRT/ConvertComp.gif"; exec ("/usr/bin/convert -size 100x100 xc:black SRT/WB140.gif -geometry +0+0 -composite SRT/WB_140.gif -geometry +50+0 -composite SRT/BW_140.gif -geometry +0+50 -composite SRT/BW140.gif -geometry +50+50 -composite $OUT"); ?> |  |
You can also resize each image using composite by adding the size before the geometry for that image. However this is only helpful if you have a different image for each placement. You cannot resize one image as it will overwrite itself everytime. You need images with different names. <?php $OUT="SRT/ConvertCompRZ.gif"; exec ("/usr/bin/convert -size 75x75 xc:black SRT/WB140.gif -geometry 25x25+0+0 -composite SRT/WB_140.gif -geometry 25x25+50+0 -composite SRT/BW_140.gif -geometry 25x25+0+50 -composite SRT/BW140.gif -geometry 25x25+50+50 -composite $OUT"); ?> |  |
You can also use -flatten to put images together. The first command -page widthxheight+0+0 img sets the size of the canvas. -page +left+top precedes each image. The background color and -flatten puts it all together. <?php $OUT="SRT/flatten.gif"; exec ("/usr/bin/convert -page 100x100+0+0 SRT/WB140.gif -page +50+0 SRT/WB_140.gif -page +0+50 SRT/BW_140.gif -page +50+50 SRT/BW140.gif -background black -flatten $OUT"); ?> |  |
Mosaic is used just like flatten except that you do not need to declare a size. It creates a virtual canvas at the background color specified. <?php $OUT="SRT/mosaic.gif"; exec ("/usr/bin/convert -page +0+0 SRT/WB140.gif -page +50+0 SRT/WB_140.gif -page +0+50 SRT/BW_140.gif -page +50+50 SRT/BW140.gif -background black -mosaic $OUT"); ?> | 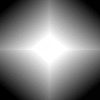 |
PAGE 2: EXAMPLES | |
| View all the Angles in these files: Background Black Background White | |
|
All IM Tutes © 2008 LingoLinda.com | |