30x30
|
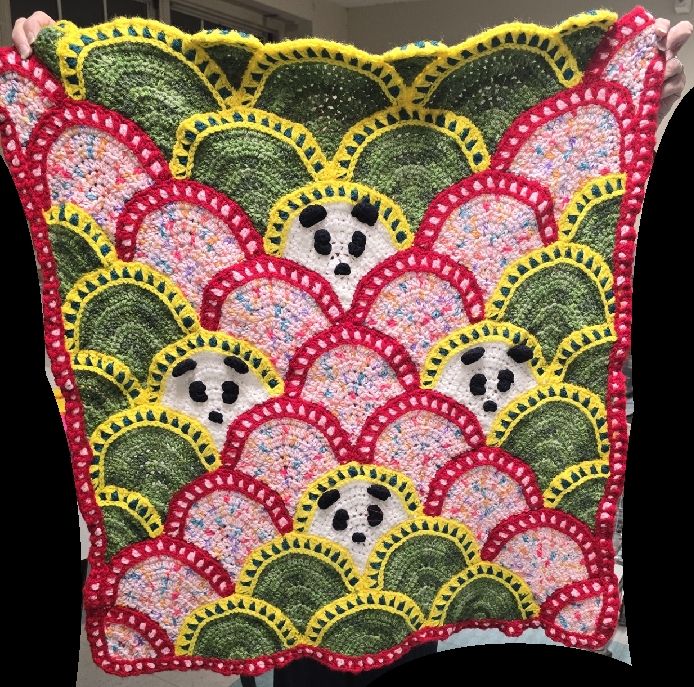
Red Heart Yarn: I used partial skeins, red, green, pink, yellow, white. Plus black cotton for face features.
Crochet hook: J You can use whatever yarn and hook suits you. The size may differ from above. |
|
Crochet Clamshell Pattern Chart
Improvised diagram | |||
| Row | PATTERN | Stitches | |
| 11 | + + + T T T V T T T V V V V T T T V T T T + + + * | 30 | |
| 10 | * T T T T T T T V T T T T T T V T T T T T T T | 24 | |
| 9 | T T T V T V T V V T V T V T T T * | 22 | |
| 8 | * T T T T V V V V T T T T | 16 | |
| 7 | T T V V V V T T * | 12 | |
| 6 | * T T V V T T | 8 | |
| 5 | T V V T * | 6 | |
| 4 | * T V T | 4 | |
| 3 | T Tu T * | 3 | |
| 2 | * V | 2 | |
| 1 | T * | 1 | |
| 0 | (ch2) | ||
|
* = Chain + = SC: Single Crochet. T = HDC: Half Double Crochet. V = HDC x2: Two Half Double Crochet in same stitch (increase) Tu = BPHDC: Back Post Half Double Crochet. YO, insert hook in same stitch just made, Push hook around post of next stitch to the left and bring hook out to front, YO, pull through, YO, pull through all loops on hook. | |||
|
Reading the Chart above: Row 0: Chain 2. Row 1: HDC in 2nd chain from hook, chain 1 turn. Note: If you get confused on which direction to read the chart, the ch 1 or * is at the end of every row. The asterisk in the last row indicates to ch 1 and cut yarn. Don't worry too much though, because all of the rows read the same frontwards or backwards. The chart for the side shells differ. Row 2: 2 HDC in first stitch. Chain 1 turn. Row 3: HDC in 1st stitch, Tu in same stitch, HDC in last stitch. Chain 1 turn. Row 4: HDC in 1st stitch, 2 HDC in next, HDC in last, Chain 1 turn. The rest of the chart should be self explanatory. | |||
| |||
| CROCHET SIDE SHELLS PATTERN CHART | ||
| Row | Pattern | Stitches |
| 9 | T T V T V T V T V T T * | 15 |
| 8 | * T V T V T V T T | 11 |
| 7 | T T V T V T * | 8 |
| 6 | * T V V T | 6 |
| 5 | T V T * | 4 |
| 4 | * V + | 3 |
| 3 | V * | 2 |
| 2 | * # | 1 |
| 1 | T * | 1 |
| 0 | (ch2) | |
|
# = SSC: Slip single crochet in same stitch. Insert hook into next stitch, YO, pull through 1 loop on hook YO, insert hook into same stitch, YO, pull through, YO, pull through all 3 loops on hook. | ||
|
Another note about the half end shells is that they appear smaller than the whole shells. This pattern (and I have tried several versions) seemed to be the one that straightened out the sides of the afghan the best. When you sew them into the afghan, there is no need to see to it that it fits in like a clam. You just sew it wherever it falls naturally. The border may appear to protrude slightly, but that will straighten out when it is stitched to the next row. | ||
| PANDA FACES |
| I used black cotton yarn for the Panda face parts. They were sewn on using an embroidery needle and a thinner white cotton yarn, catching the stitches toward the back of the piece so they do not show. They can be stitched onto the clamshell either before or after the clamshell is stitched onto the afghan. It is a little easier to stitch the faces on the shell before attaching the shell, but there is a light chance that the face will appear tilted. The surest way to get the face on the way you want it is to sew it on a clamshell that has been attached to a single row of clamshells, before sewing the row onto the afghan. |
| Eyes: Ch 2, 4 sc in 2nd chain from hook., slst to 1st sc. Chain 2, 4 sc in 2nd chain from hook. Join to 1st stitch of 1st round using a slst. Cut and weave yarn. |
|
Ears: Chain 3, 2 hdc in 2nd chain from hook, 2hdc in last chain, ch 1 turn. Row 2: 2 sc in 1st stitch, 2 hdc in next 2 stitches, 2 sc in last stitch. Ch 1. Finish: Turn work and working along the bottom of the ear, DSC across the bottom for a total of 3 DSC. Cut yarn and weave.
DSC: Decrease single crochet: Insert hook in 1st stitch, YO, pull up a loop. Insert hook in next stitch, YO, pull up a loop, YO pull through all loops on hook. |
| Nose: Ch 2, 3 sc in 2nd chain from hook. Cut and weave yarn. |
|
BORDER PATTERN MC Main Color. Essentially the color that will frame the fill color. It is on the top and bottom of the border. FC Fill Color. Will appear between the MC stitches in a checkered pattern. Place hook into the first stitch at the top of the clamshell. This stitch is the one that was cut off and woven through on the previous row. YO with both MC and FC. Pull through and tie off by pulling the ends through the loop on the hook. Knot tightly pulling on both sides of both colors. These ends can be woven through as you crochet the first 4 or 5 stitches. They won't show when the border is completed. Inside row: Insert hook into the next (2nd) stitch, YO, pull the FC only through (let the other yarn color hang loose). Also be sure the catch the loose ends under the first few stitches. Working with the FC, Slst, SSC in same stitch. *Ch 1, skip 1 stitch, SSC in next stitch.* Repeat from * to * to the end of the row, ending in the last stitch. Tie FC off and weave end in.
Outside row: Insert hook into first stitch (where the knot is). Pull MC through, Slst, SSC in same stitch. Ch 1, skip 1, SC in front loop only of the chain stitch in the prior row. To do this insert hook into the chain from under the chain up through to the top, YO, pull through both loops on hook (SC completed). This stitch anchors the prior stitch and adds flexibility to the row, and keeps the color from showing on the back. Inner bottom row: Turn the shell so that you are holding it along the border side, keeping the MC yarn below the shell as you work along this row. SlSt into the base of the FC stitch. Insert hook into the base of the MC stitch, pull up a loop and SlSt. Continue across the row ending with a SlSt around the edge of the shell. Fasten off leaving a tail of about 6 inches for sewing to adjoining clamshell. I chose to use the SSC stitch for this because it adds width to the stitch. The row can be completed without having to add any increased stitches. They are even, so the overall row will be even when stitching together. It also keeps the shell well balanced.
NOTE: I have tried several ways to achieve this effect. I wanted the edge of the border to be one color which makes its easier to sew the shells together. If I tried to carry the yarn and change color with each stitch, I would end up with a checked pattern along the edge and then have to go back and add a top row of MC. I tried the Apache Tears type of stitching but it seemed too bulky.
|
| ASSEMBLING THE AFGHAN |
|
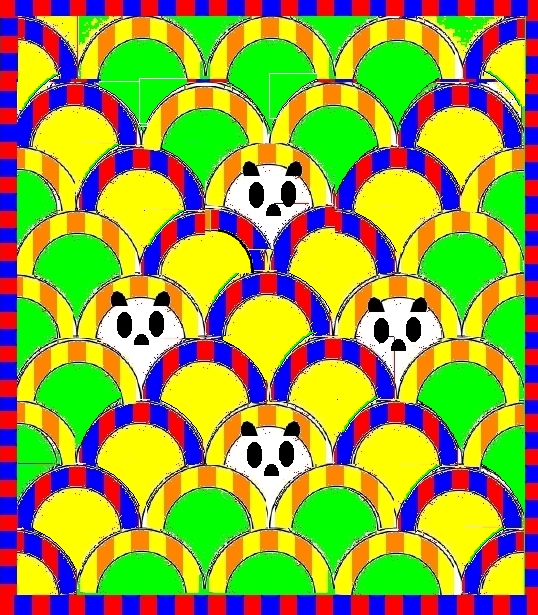
I found it less confusing or cumbersome if I assembled the afghan as I went along, beginning with the bottom right-hand corner. First I charted out my design on this free template from Julie Hirt.com. Here is a Sample template of my afghan. Second I made the half circles for the bottom row first. These half circles (and all the clamshell rows above it) are first stitched together as they are created. Working one row at a time, I completed the clamshell sections for each row. Then I added the border as I assembled and sewed the afghan in the following manner. Third Working from right to left, complete the shells/rounds for the row without the border. The border will be added as the rows are sewn together. Begin with the first shell on the right side of the row. Finish it off, border and all, weave in ends. Take the next shell to the left of this 1st shell, and complete the border leaving a 6 inch tail at the completion of the border. Using this tail, weave it to the top of the border at the 1st stitch on this shell. Stitch this top 1st stitch to the top 1st stitch of the left side of the other completed shell/round. Place shells with right sides together with the working shell on top (the right side is the one with the slip stitch line along the border. Wrong side has a line of stitches). Stitch the sides for 3 stitches, ensuring that the 1st and 3rd stitches are knotted in tight. Weave and cut the yarn. Unfold the shells and work on the next shell, attaching in the same way. If it does not appear closed tight at the top stitch once you open it up, that can be fixed when you sew the shells together with the next row. 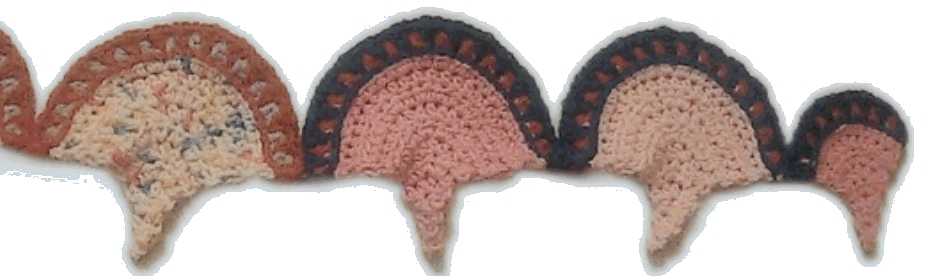
Work each row the same way and stitch the rows to the afghan easing and fitting into place using clips. Just 1 or 2 clips are necessary for the shell you are working on. You can line up the point where 2 shells are joined together with the center of the shell it is being stitched to. The half shells on the end of every other row can be sewn in place as it falls naturally along the side. No fitting or manipulating is necessary. |