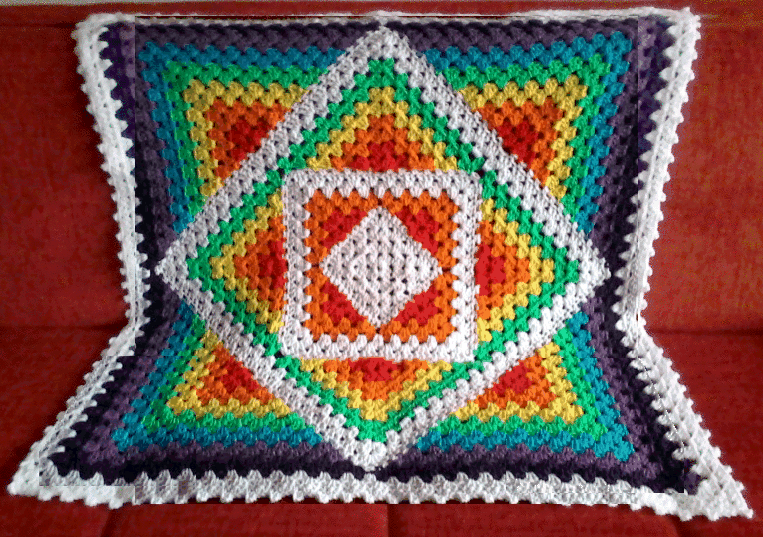
Crochet Prism Granny Afghan
|
Materials 1 skein each Red Heart Super Saver: Red, Orange, Yellow, Green, Blue, Violet, Purple, White. Boye Crochet hook I/5.5 mm. |
|
The completed afghan is 36x36. This pattern is worked up in 1 piece. The general construction is that of a granny square center, followed by a granny shawl pattern (triangle shape) crochet on all 4 sides of the square to create another square. Then 2 rounds of a granny pattern, with more triangle sides, etc. There is 1 foundation row of sc before starting the triangle sides, in order to set up spacing so that the triangles fits properly without warping or bowing, (as the stitches are going in a different direction). The afghan can be made larger by either adding another set of triangles to the sides, or by finishing with more granny square rows.
|
|
Prism Granny Instructions: |
|
Note: Leave the beginning yarn end hanging towards the back until the afghan is finished, in order to mark the wrong side of the work, (so it is easy to tell on what side to begin a new triangle). |
| With white, Ch 5, Join with a SlSt to make a ring. Ch 2 (counts as a dc), 2 dc, *ch 2, 3 dc in ring*. Repeat from * to * x2. Ch 2, join to top of 1st Ch 2 with a SlSt. Turn work. |
| Round 2: Ch 2 (counts as a dc), 2 dc, Ch 2, 3 dc in Ch 2 space. *3 dc, Ch 2, 3 dc (corner) in next Ch 2 space,* Repeat from * to * x2. Join with a SlSt to top of 1st Ch 2. |
|
Round 3: Ch 2, 2 dc in center space, 3 dc, Ch 2, 3 dc in corner Ch 2 space. *3 dc in center space. Work a corner (3 dc, Ch 2, 3 dc) in corner*. Repeat from * to * x2, ending with a slst to top of 1st Ch 2.
Round 4: Ch2, turn work, 2 dc in space just below the Ch 2, and work in pattern around, ending with a slst to top of 1st ch 2. Cut yarn.
|
|
Triangle Construct Row:
This row sets up the necessary stitches needed for the triangle sides to line up with the granny square without warping or bowing. These instructions hold true for every Triangle Construct Row in the afghan. |
|
Working on the wrong side of the granny square, with the cut end on the right side, use a 4-5 inch length of contrast color yarn to mark the center space on the top row. No need to tie it, just let it hang inside the center space.
Attach white yarn to the top right corner, ch 2, sc in the first dc stitch. Ch 1, skip 1, sc in next stitch. Continue working to center. When you get to the center, ch 2, skip 2 (the 2 stitches on either side of the center space), ch 1, skip 1, sc in next stitch. At end of row, end with a sc in last stitch, ch 2, sc in corner space. You should have 7 spaces across the row just completed. Continuing around the square, move the contrast yarn clipping to the center of the next side. Ch 2, sc in 1st stitch on next side, continue in pattern all around the square, being careful to match the number of stitches on the last row where the yarn had been cut. End with a sc in the last stitch, ch 2 sc in corner, join to 1st chain with a slst and cut yarn. |
|
First Side Triangles: Row 1: On the right side of the granny square, with red, attach yarn to center space on any side (4th space counting corner space), and push toward the right side of the space, draw up a loop and Ch 3. Turn work and sc in next space on granny square (to the left). Turn work again, 2 dc in same center space as the joining yarn. Ch 2, 3 dc in same center space (angle corner). sc in next space along the square granny. |
| Row 2: Chain 2, sc in next space (on granny square edge), turn work. 2 dc in sc on triangle side. Work an angle corner (3 dc, Ch 2, 3 dc) in top triangle space. 3 dc in sc (along triangle and granny square edge). sc in next space on granny square. Cut red yarn. |
| Row 3: Attach orange yarn to the last red sc (on wrong side of work). Ch 3, sc in corner space, turn work, 2 dc in red sc, 3 dc in next space (along red triangle), angle corner in next corner, 3 dc in next space, 3 dc in sc on granny square edge, sc in granny square corner. CH 2, (this last cluster will line up to form a new granny square when all 4 side triangles are completed) turn work, |
| Row 4: 2 dc in sc just made, 3 dc in next 2 spaces, corner in next corner, 3 dc in next 2 spaces, 3 dc in sc on granny square corner. Cut orange yarn and tie off. |
| Other 3 triangle edges: Working on the right side, with triangle side just completed on the left side of the square, attach red yarn to center of top row. Repeat rows 1-2 of Triangle. Attach orange yarn and repeat row 3. At the ch 2 at end of row 3 (before turning the work), slst to top of ch 2 on completed triangle on the left. Complete row 4 as above. On the 4th triangle, join with a slip stitch at end of the last row. |
| Cut and weave in ends. |
|
Granny Square Rounds. Note: The triangles should only be worked on sides that have an odd number of spaces. Each round of a granny square will increase the spaces by 1. |
| Attach white yarn to any corner on the right side of the granny square. Work 2 rounds in granny square pattern, turning work between rounds, There should be 10 clusters and 11 spaces across each side. Cut and weave ends. |
|
Second Triangle Construct Row: This row is worked similar to the first Construct Row, except that the first sc is made in the second stitch instead of the first. To configure where to begin a construct row (if making a larger afghan), first find the center space. Make note of the 2 stitches that will be skipped and then moving toward the corner of the row note where you will stitch and skip, and where you end up at the 1st stitch, whether it should be stitched or skipped. |
|
This row begins as before by marking the center with a yarn scrap, joining white yarn to an upper right hand corner, ch 2 and sc in the 2nd stitch on the row, ch 1, skip 1, sc. Continue in this fashion to the center, ch 2, skip 2, sc in next, ch 1, skip 1, etc to end of row where you will sc in 2nd to last stitch, ch 2, sc in corner space. Work around square. There should be 15 spaces along each side. |
|
Second Triangle rows:
Row 1-2: Attach red to center space on the right side of any side of the granny square. Work same as rows 1-2 of Triangle in red on all 4 sides. Weave in yarn ends. |
| Rows 3-4: Attach orange yarn to the last red sc (on wrong side of work). Ch 3, sc in next space on the construct row, turn work, and work 2 rows of triangle pattern. on all 4 sides. Cut and weave ends. You should have 3 empty spaces left on either sides of the triangles at this point. |
| Rows 5-6: Attach yellow to the sc on the left side of the orange triangle, on the wrong side of the work, and work 2 rows of triangle pattern on all 4 sides. You should have 1 empty space on either side of the triangle. Cut and weave ends. |
| Rows 7-8: Attach green to the sc on the left side of the yellow triangle, on the wrong side of the work. Work in pattern for 2 rows. Cut and weave ends. |
| Complete the second Triangle Sections joining the green (last) sections as before. |
| Work 2 rows of white granny pattern, turning work between rows. |
Third Triangle Construct Row: Work 1 row of white Triangle Construct Row, (using the formula described above), start by joining yarn in a corner, ch 2, sc in 2nd stitch from corner, skip 1, sc in next, to center, ch 2, skip 2, sc, ch 1, skip 1, sc in next. Follow pattern all around the square. |
|
Third Triangle Rows: Work another set of triangles in the following colors: Red, orange, yellow, green, blue, violet, and purple, joining the triangle after the purple rows are completed. Work 2 more rows of granny square in white. |
|
Finishing: With white, work a sc in each dc, and a picot in each space. Picot: Insert hook into space, Ch 3, insert hook in horizontal bar stitch at base of the chain, draw up a loop and sc, sc in space again. |