Crochet Prism Granny Variation Afghan
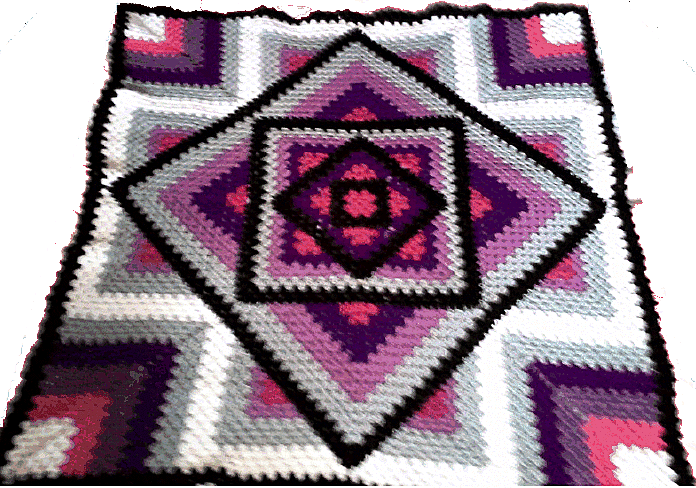
Click for larger view
|
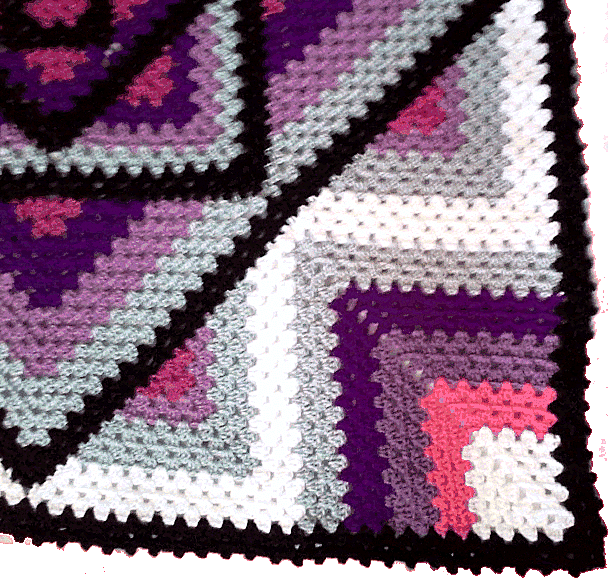
This afghan is a variation on the Prism Granny Afghan. The center 36x36 section is the same as the Prism Granny (without the finishing row), except for the colors, and those instructions will not be repeated here. These instruction only cover the final 4 triangular sections around the afghan. As shown below, this variation uses 2 small triangular sections (completed at the white yarn sections), with a granny square filling in the corner of the afghan in rounds of different colors. As with the first version of the afghan, there is no sewing required. |
|
Prism Granny Variation Instructions: |
|
Triangle Foundation Row: Find and mark center (16th space). Find centers on right and left of center. This would be the center dc on the 8th 3 dc cluster from corner and center marked space. Attach yarn to corner, ch 2, sc in 2nd stitch, *ch 1, skip 1, sc* in next. Repeat from * to * to dc stitch just to the right of the marked center. Ch 2 skip center dc, sc in next. Repeat from * to * to next marked center. Ch 2 sc in center, ch 2, skip 1 stitch, sc in next. Continue to dc stitch next to marked stitch. Ch 2 skip marked center, sc in next. Continue to end of row, skip last stitch, ch 2, sc in corner. Note: There should be 46 spaces along each side with a ch 2 space on the 1st (corner), 12th, 23rd, 24th, 35th, and 46th (last corner) spaces. It does not matter if you count from right or left, they should match either way. |
|
Attach yarn to the 12th space. There will be 12 rows worked in each triangle, with the last, 12th row, being crochet as one long row that spans both triangles. Work 11 rows (in your color choices) in the triangle pattern. Cut yarn but do not tie off. It will later be attached to the final triangle row, and can be tied off then. Repeat the triangle sections on the other end of the same side. Attach yarn to 12th space from the opposite side of the same row and work another 11 rows in the triangle pattern. Do not cut yarn. Work 1 more row across both triangles, starting with a ch 2, 2dc in sc, work pattern across 1st triangle, ending with 3 dc in last sc, sc in sc between the 2 triangles, 3 dc in 1st sc on next triangle and continue across in pattern, ending with a 3 dc cluster. Cut but do not tie off, as it will be connected to a triangle on the adjacent side.
Filler Granny Square. Working on the wrong side, attach yarn to tip of triangle on the right. Ch2, 2 dc in space, 3 dc in next 11 spaces along the triangle. Continue working 3 dc across the 12 spaces of the 2nd triangle, skipping the space between triangles. Ch 2, turn. Row 2: 3 dc in next space and each space across both triangles, skipping the space in the center between the 2 triangles. End with 3dc in last space, 1 dc in space between 1st and 2nd dc. Ch 2, turn. Row 3: 2 DC in space between the 1st dc and 3rd dc on the previous row. Contine in pattern, skipping center space between triangles, and ending with 3 dc in last space, ch 2, turn. Row 4: 3 dc in next space and continue in pattern, ending with 3 dc in last space, 1 dc in space between 1st and 2nd dc. Ch 2, turn. Row 5: Repeat row 3. Continue in pattern until the whole square area is filled, ending with one 3 dc cluster on each side, ch 2 and slst to opposite dc, to make a corner ch 2 space. |
|
Complete all four sides in the same manner, joining the triangular sections with a slst. Finishing: With border color, work 2 rounds of a granny square pattern. Work a final row of sc in each dc, and a picot in each space. Picot: Insert hook into space, Ch 3, insert hook in horizontal bar stitch at base of the chain, draw up a loop and sc, sc in space again. |