
|
PHP GRADIENT ART |
If you know how to do html gradtables this art will be easy to learn. If you are new to this it will be a bit more challenging but possible. The html background makes it easy to have a working copy of a design and the numbers which you can just translate in to php code and duplicate.
This tutorial will show two methods as your starting points. One is from html gradtables. The second is from graphs of images.
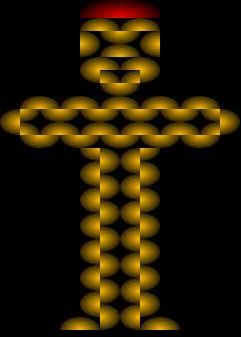
This is the gradtable I chose to make an image. It is not fantastic but it was fairly simple coding which is why I chose it. SCARECROW IMAGE PC users will need to download the webTV viewer to view the html gradtable. The first thing I did was to take out the background and all the centering on the html page. This will allow me to figure out my numbers starting from 0 on the left side of the page. After removing the centering however I had to add a spacer to center those parts of the code that were centered, such as the head and legs centered at the arms. Now the page looks like this. PLAIN TABLE
I want to delve right in to the html code because I think it is easier to explain the numbers from something familiar before going in to unfamiliar territory. For those familiar with composite at IM Imagine that each of your TD cells is an image. And you took that image to Image Magick and composited it on to a blank page. You will need to know where on the page to put that image. It could be something like NW +10+30. 10 pixels from the left and 30 pixels from the top. Imagecopy with php code is similar to that. We tell the server where on the background to put the image, but we also tell the server the size (width and height) of the image.
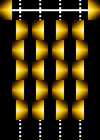
Here is the html code for the top part of the scarecrow's head.
<td height=18 width=80></td>
<td colspan=2 bgcolor=6600cc gradcolor=000000 gradangle=-140 width=20 height=18></td>
<td colspan=2 bgcolor=6600cc gradcolor=000000 gradangle=140 width=20 height=18></td></tr><
tr>
Starting with line 1, I have a starting point from my left side of the page of 80 pixels (this was used to center the head). The height of the TD is 18 pixels, but we aren't concerned with the height of this empty spacer cell because we want to start from the top and that is 0. This is where I begin my php code. Jot down the numbers 80, 0, as starting point. The next TD cell in the html is my first gradangle (the hat). I will need an image that is 20x18 for each cell. I have those Here and Here. With experience I'm sure you can combine those two cells in to one image instead of two but for now I made an image for each cell.
Now my numbers will look like this:
For the second TD cell the number will only change for the first number and becomes:
OK let's move on to the php page in its entirety. There is one decision you have to make before you begin. Do you want a jpg, gif or png? For the colors to appear as separate entities in themselves and not merge or blend with other colors you need to make your images all gif, all jpg or all png, or it will not work properly. There are differences too in how each image appears, different shades of color in the PHP drawing. Here are samples of what the different image forms produce in colors--all colors being equal. Red is ff0000 and the gold is cc9966.
| JPG | 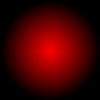 |  | 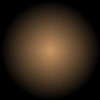 |
| PNG |  |  |  |
| GIF | 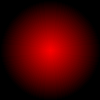 |  | 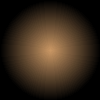 |
Once you've made your decision and made all the images required you are ready to begin. Your images will need to be the exact size you want to copy if it is necessary to get a gradient or other effect. PHP does not stretch or compress images like html. It just cuts it at the point given. So if the gradient is not necessary you can use an image that is larger than the area you are trying to cover and PHP will just chop the image off at the point specified for the lower right hand corner. You will also need an image for your background or canvas, large enough to fit your total page on and must be image type your are working with. Can be your color of choice. Transparency only works with gif and png.
Open a new file and give it a name with a php extension. We begin by defining our header or image type. Then we give a variable name to every image being used in the table. The first variable is the background image and php will treat this variable name as the name of the whole newly created image at output, as everything is on it. Here are the codes I used.
<?php
header('Content-type: image/jpeg');
imagecreate(320, 350);
$back = imagecreatefromjpeg("black.jpg");
$NEred = imagecreatefromjpeg("NEred-new.jpg");
$NWred = imagecreatefromjpeg('NWred-new.jpg');
$NEgold = imagecreatefromjpeg('NEgold-new.jpg');
$NWgold = imagecreatefromjpeg("NWgold-new.jpg");
$SEgold = imagecreatefromjpeg("SEgold-new.jpg");
$SWgold = imagecreatefromjpeg("SWgold-new.jpg");
imagecopy($back, $NWred, 80, 0, 0, 0, 20, 18);
imagecopy($back, $NEred, 120, 0, 0, 0, 20, 18);
imagejpeg($back);
imagedestroy($back);
imagedestroy($NEred);
imagedestroy($NWred);
imagedestroy($NEgold);
imagedestroy($NWgold);
imagedestroy($SEgold);
imagedestroy($SWgold);
?>
Reading the code from the header, I told the server I wanted to create a jpeg. Substitute gif or png for jpeg on that line. Always use jpeg in the header as opposed to jpg. You must use jpeg when talking to the server but you can use jpg in an extension on an image that you want the server to copy from. So that is why you use imagecreatefromjpeg('image.jpg'). Next, define the size of your image in imagecreate(width, height); this is the width and height of your back image. The back image is the first variable defined, followed by all the variables of all the other images used in the script. When you have defined all the variable, begin the imagecopy() codes. Those numbers should look familiar from our html page. The complete code for one image copy is:
imagecopy($back, varable of image being copied, pixels from left, pixels from top, top left of image to copy such as 0, 0, and bottom right of image to copy such as 20, 18);
This command is used for each and every TD cell. It always ends with a semicolon. Once all of the images to copy are input then we close the code by first telling the server to make the image now.
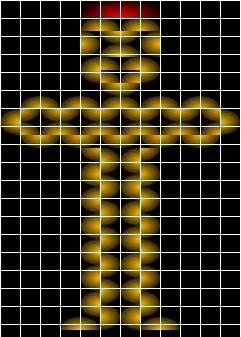
imagejpeg($back); Use gif or png instead of jpeg here. The last set of codes tell the server to clear all those images from its cache and clear up some space. Just copy the codes as they appear, using one for each variable. And now you should have an image that you can beam in to your directory with the php url and change to a jpeg or gif or png as you had created. It is really not difficult once you get everything organized. You can study tne entire PHP code for this image. Here is my completed image. I have also put a grid over this image to show you how to work with graphed images.
 |  |
You can find a collection of gradient images in jpg form Here. These can be changed to png or gif at Image Magick. I also have a collection of Gradcircles that you can chop up for images. They can also be resized to your needs.
If you become very familiar with the coding for this art form, you may use loops in the PHP code. I made this simple windchime with loops. Then I took the image to IM, tinted it and resized it and here it is. Interested in the html version?
