Gradient Montage Image
Example Image | |
This is a tutorial on how to create a montage of gradient images using PHP and the GD Library. You must have access to the GD Library and PHP on your server for this script to work. | |
The script that does all the work will be used as an include on each page you create. You do not need to do anything to this script, except to place it in the same directory as the canvas file that you will be working with. The include file is called GradMontageOTF.php. | |
Every image you create will need the following script to begin. Here I will explain what the script does. |
Every file must begin with a <? tag and end with a ?> tag.
This first line is the include line, telling php to use the script in the GradMontageOTF.php file.
| |
include('GradMontageOTF.php'); | |
The next line tells the server to create a background canvas to work on. The only thing you would need to change on this line is the size, 300=width and 500=height. | |
$image = imagecreate(300, 500); | |
Next you need to allocate a color to the background. This code creates a white background. You can change the color to what you wish by changing the numbers. | |
$white = imagecolorallocate($image, 255, 255, 255);
| |
Output the background image to the server. First decide what type of image you want to create, gif, png, or jpeg, Changing the type in the header line to image/gif, image/png or keeping it image/jpeg. Second line use imagegif, imagepng or imagejpeg respectively. In this example I am creating a jpeg image. You must give a name to the image within the single quotes, a jpeg can be named with just jpg. Here I am calling it whiteback.jpg. It will output an image to your server.
|
header("Content-type: image/jpeg");
imagejpeg($image,'whiteback.jpg');
imagedestroy($image);
| |
Next you need to call the image just created in order to draw on it (for some reason the script will not draw the gradients unless the background is precreated). This code does that. If you used gif or png you must change the code to imagecreatefromgif or imagecreatefrompng respectively. | |
$image = imagecreatefromjpeg('whiteback.jpg');
| |
Alternatively, you can skip all the codes that create the back and just begin with a premade background of your choice, any image. For example: |
<?
include('GradMontageOTF.php');
$image = imagecreatefromjpeg('mycoolimage.jpg');
| |
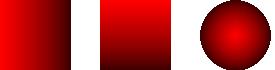
Now come the codes for drawing gradients. You can create 3 types of gradients with this script, horizontal, vertical, or radial. The codes are all similar with the exception of the call name. |
horizontal($image, 0, 0, 50, 50, array(255, 0, 0), array(60, 0, 0));
vertical($image, 0, 0, 50, 50, array(255, 0, 0), array(60, 0, 0));
radial($image, 0, 0, 50, 50, array(255, 0, 0), array(60, 0, 0)); | |
Looking at the numbers, the first two numbers 0, 0, designate the x and y positions on the page (or background) where you want the gradient to appear (x number of pixels from the left and y number of pixels from the top. the second two numbers 50, 50 is the size of the gradient (50 pixels wide by 50 pixels in height). Within the array, the first set of 3 numbers are the start color and second array of 3 numbers are the end color. These colors can be expressed as hex numbers by writing them as 0xff, 0x0, 0x0 for red. The above codes will output the following images. |
 | | By swaping the start and end colors, you get the following images. |
horizontal($image, 0, 0, 50, 50, array(30, 0, 0), array(255, 0, 0));
vertical($image, 0, 0, 50, 50, array(30, 0, 0), array(255, 0, 0));
radial($image, 0, 0, 50, 50, array(30, 0, 0), array(255, 0, 0)); |
 | |
You can create tubes by putting two horizontal gradients side by side, or two vertical tubes on top of each other. |
horizontal($image, 0, 0, 25, 50, array(60, 0, 0), array(255, 0, 0));
horizontal($image, 25, 0, 25, 50, array(255, 0, 0), array(60, 0, 0));
vertical($image, 0, 0, 50, 25, array(60, 0, 0), array(255, 0, 0));
vertical($image, 0, 25, 50, 25, array(255, 0, 0), array(60, 0, 0)); |  | |
You can stack gradients on top of one another. |
horizontal($image, 0, 0, 90, 90, array(0xff, 0x0, 0x0), array(0, 0, 0));
horizontal($image, 15, 15, 60, 60, array(0, 0, 0), array(0xff, 0x0, 0x0));
horizontal($image, 30, 30, 30, 30, array(0xff, 0x0, 0x0), array(0, 0, 0)); |

| |
You can make ovals out of the radial codes. | |
radial($image, 10, 35, 20, 70, array(255, 0, 0), array(60,0,0));
radial($image, 75, 25, 100, 50, array(255,0,0), array(60,0,0)); |
 | |
Radials, however, are positioned on the background different than the horizontal and vertical gradients. They are positioned by the center of the radial as opposed to the top left corner as the others are. In other words, a radial that is 20x70 in size and wanting to be placed at 0,0 on the page would have to be placed at 10,35 which is the center point of the radial. |
To draw a rotated angle, the parameters are a little different. The number are as follow:
angle($image, x1, y1, x2, y2, width, start_color, end_color);
angle($image,50,50,90,90,20,array(166,0,0),array(255,0,0)); will give you:
|
 |
It is possible to line up 2 angles, but it takes some figuring out to get the x,y numbers. Colors should be reversed.
angle($image,50,50,90,90,20,array(166,0,0),array(255,0,0));
angle($image,35,65,75,105,20,array(255,0,0),array(166,0,0));
|

|
Arcs have been added to this script on 10/17/2013. For an arc you should add some extra parameters to the code for the angle of the filled arc.
arc($image, $x, $y, $width, $height, $angle_start, $angle_end, $start_color, $end_color);
arc($image, 20,50,90,90,250,0,array(255,255,0),array(133,133,0));
Gives this image:
| |
Finally the codes to finish the page/script are as follows: |
//THIS LINE LIGHTENS UP COLORS A BIT
imagegammacorrect($image, 1.0, 1.537);
header("Content-type: image/jpeg");
imagejpeg($image);
imagedestroy($image);
?>
|
Again, the image/jpeg and imagejpeg codes should be changed to the type of image you created at the beginning. When you are done with your image, you can output it as a jpg, etc. to your server by giving it a name within the imagejpeg line such as:
imagejpeg($image, 'imagename.jpg');
Once you have done that, you will not be able to see your image when you view the script, but the image should be loaded into your directory. To view the script again, remove the imagename. |
Study on Placement
Here is a zip of the script and an example page. Download
More Sample Images
Another sample tutorial, transparent png
|
|
|
