Gradient Penguin Tutorial
| This tutorial is a supplementation to the Gradient Script tutorial. It is an example page for coding a gradient penguin, using the Gradient script. This tutorial mainly covers working with radials and arcs. | |
| For each and every file you create, you will need a blank canvas to work on. This is all explained in the Gradient tutorial, and will not be covered here. For simplicity, I took an image that I found on the web and took it to Image Magick, used edge detection and negate to get an outline and composited that image onto a grid. The grid helps with location, but it is not perfect. | |
|
First I want to copy the grid onto my canvas, so that I can align my gradients on top of it. When I am finished I can remove the grid. For more information on this you can check my GD Tutorials (Lesson 9). I did not place it at the edge, just to have some extra room, in case I wanted it in the future, but it can be trimmed at Image Magick. Also the canvas is larger than I need, but I can make it smaller when I am finished. The background is set to be transparent, but you should comment out the //imagecolortransparent($image,$black); while working with the grid, otherwise the black in the grid will be transparent. So my first 2 linee of code are: $penguin=imagecreatefromgif('penquin.gif'); imagecopy($image,$penguin,30,0,0,0,201,300); | |
| I can start adding gradients anywhere to the grid, because working with a script allows me to comment things out or move things around in order to get the effect I want. To illustrate this, I will start with the head. arc($image,130,130,200,252,180,0,array(120,120,120),array(1,1,1)); | 
|
|
arc($image,130,130,200,80,0,180,array(120,120,120),array(1,1,1));
I used arcs for the head, because it is not an exact circle. The top arc is 252 px high while the bottom arc is only 80 px high, and it gives it that shape, even though both arcs are 100 px wide. For an image on arc directions check Sally's arc image. My top arc is from 180 to 0, while the bottom arc is from 0 to 180. I also did not use solid black because this color will be transparent, so I used 1,1,1 for the black and a grayish color for the gradient. | 
|
|
Now I need to comment out those 2 lines of code so I can see the grid for location of the eyes. The eyes again are a similar shape as the head, so I'll use 2 arcs for each eye. arc($image,90,110,80,150,180,0,array(255,255,255),array(130,130,130)); arc($image,90,110,80,55,0,180,array(255,255,255),array(130,130,130)); arc($image,170,110,80,150,180,0,array(255,255,255),array(130,130,130)); arc($image,170,110,80,55,0,180,array(255,255,255),array(130,130,130)); It can be a little tedius to figure out size and location, but once you get one as you want it, the other is easier. Here the right eye is the same as the left, only moved over more on the page. I used a white and gray shade in the gradient, so it would not be so dark, and still have a gradient. Again comment out to see the eyeballs. | 
|
|
I'm using radials now for the pupils. Once I get the left eye figured out, the right eye is the same only moved over more to the right of the page. //RIGHT PUPIL radial($image,105,90,20,50,array(120,120,120),array(1,1,1)); radial($image,110,90,10,20,array(255,255,255),array(100,100,100)); //LEFT PUPIL radial($image,155,90,20,50,array(120,120,120),array(1,1,1)); radial($image,150,90,10,20,array(255,255,255),array(100,100,100)); | 
|
|
Now I can add the nose, using a radial again. radial($image,130,140,80,45,array(255,255,0),array(100,100,0)); |
|
|
Now I can uncomment the face to see the whole image. $penguin=imagecreatefromgif('penquin.gif'); imagecopy($image,$penguin,30,0,0,0,201,300); //HEAD arc($image,130,130,200,252,180,0,array(120,120,120),array(1,1,1)); arc($image,130,130,200,80,0,180,array(120,120,120),array(1,1,1)); //EYES arc($image,90,110,80,150,180,0,array(255,255,255),array(130,130,130)); arc($image,90,110,80,55,0,180,array(255,255,255),array(130,130,130)); arc($image,170,110,80,150,180,0,array(255,255,255),array(130,130,130)); arc($image,170,110,80,55,0,180,array(255,255,255),array(130,130,130)); //PUPILS radial($image,105,90,20,50,array(120,120,120),array(1,1,1)); radial($image,110,90,10,20,array(255,255,255),array(100,100,100)); radial($image,155,90,20,50,array(120,120,120),array(1,1,1)); radial($image,150,90,10,20,array(255,255,255),array(100,100,100)); //NOSE radial($image,130,140,80,45,array(255,255,0),array(100,100,0)); |
|
|
The body is similar to the head, so I can use 2 arcs for the body, and a radial for the belly. However, I want the body to be behind the head, so I will have to put the top arc line of code in the script before the head codes. The rest can go below because it will not cover anything on the head/face. //BODY arc($image,130,250,180,252,180,0,array(120,120,120),array(1,1,1)); arc($image,130,250,180,80,0,180,array(120,120,120),array(1,1,1)); //BELLY radial($image,130,230,140,100,array(255,255,255),array(130,130,130)); |
|
|
I have to comment out the belly and the lower body arc to see the feet. For the feet I can use 2 small arcs on the top and 1 larger arc on the bottom. //TOES arc($image,65,235,40,40,180,0,array(255,255,0),array(100,100,0)); arc($image,105,235,40,40,180,0,array(255,255,0),array(100,100,0)); arc($image,155,235,40,40,180,0,array(255,255,0),array(100,100,0)); arc($image,195,235,40,40,180,0,array(255,255,0),array(100,100,0)); //FEET arc($image,85,235,80,120,0,180,array(255,255,0),array(100,100,0)); arc($image,175,235,80,120,0,180,array(255,255,0),array(100,100,0)); |
|
|
Uncomment everything, including the transparent background. Remove the grid codes which are these 2 lines. Before you uncomment the transparency, you might want to resize the background. $image = imagecreatetruecolor(250, 310); $penguin=imagecreatefromgif('penquin.gif'); imagecopy($image,$penguin,30,0,0,0,201,300); |
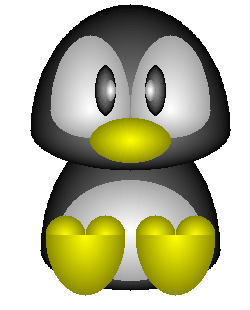 Click image to see full size. |
| For advanced GD coders, it is possible to create a tile with the gradients and tile across a drawn polygon. To illustrate this I will change the beak to a triangular pointed beak for the bottom, with a usual gradient arc for the top (take out the radial nose). | |
|
//DRAW THE UPPER PART OF THE NOSE
arc($image,130,140,80,45,180,0,array(255,255,0),array(100,100,0)); //CREATE A TILE $tile=imagecreate(85,20); $black=imagecolorallocate($tile,0,0,0); imagecolortransparent($tile,$black); arc($tile,42,0,85,35,0,180,array(255,255,0),array(100,100,0)); imagesettile($image,$tile); imagefilledpolygon($image,array(90,140,170,140,130,160),3,IMG_COLOR_TILED); For the location and size of your polygon, allocate a color in the script to use before tiling. You can view the tile by changing imagepng($image); to imagepng($tile); in order to view the tile to be sure it is how you want it. Then change back to imagepng($image); to view the whole image. Make the tile large enough so that it will cover the space without tiling inside the space. This tile is about 5 pixels larger than the polygon it is tiling. |
 Click image to see full size. |
| Whole text is here | |